Today, we start with Red. When I say 'red' what I actually mean is pink. I've found a single deep red-orange and many shades of red-violet and pink, but none of the dyes I've tried have actually produced red. I still think that there may be one out there. I have a suspicion (listed below), but no confirmation as of yet.
Strawberry: Initially, I had high hopes for strawberries. They're so colorful, after all. The problem seems to be that when rendered down either with crushing or chopping or boiling, the resulting liquid is primarily composed of the inner, pale flesh instead of the outer skin of the berries. It gives you pale, pale pinks that show some images after 5-7 days, but at low contrast. The really annoying problem with strawberry dye is that it doesn't keep. It rapidly transforms itself into a gooey mass of green-white mold. I don't think my usual solution to mold (mixing with iso-alcohol) would work, because strawberry dye is already so pale that diluting it would just ruin the whole thing.
 |
| Raspberry Dye Test |
You can boil raspberry dye to reduce it down, or you can boil the berries themselves before blending them. You can also boil the berries and smash them in the boiling bot to extract the dye that way instead of using a blender to puree them and then straining the puree. In general, I do not recommend boiling your dyes. There will be a post going into more detail on how to prep different dyes, more detail on this there.
Beet: I've only tried canned beets, and have a suspicion that they may have been tainted with artificial colors or additives. I will be trying regular beets eventually, but the results from canned beets weren't particularly encouraging and I've seen other people work with beet juice for anthotypes and not enjoyed the results. Beet juice gives you strong, bright pinks, a few shades brighter than what I'd call "bubblegum"... maybe more like cotton candy, or strawberry frosting. It exposes fairly quickly, 3-5 days giving good results. The only reason I don't like beet juice is just that I'm averse to the color. I prefer darker, stronger colors. The pink that beet juice gives is just too... pink. Totally a personal call; the dye itself has no big problems.
 |
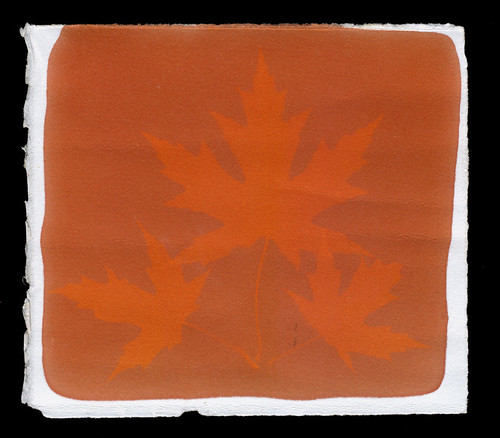
| Madder Root Dye Comparison |
Edit: Further testing has shown that it is possible to get a bright red color from madder root by soaking the paper for 1-2 full days in the dye. More details here.
 |
| Sandalwood Anthotype |
Red Wine: The easiest anthotype dye, bar none, because it can be used straight out of the bottle. There's no mixing or measuring or filtering required. All you need to do to create a red wine anthotype is buy some cheap cooking wine, paint it onto the paper and expose. Red wine can produce images within 3 days, but it does better with more time. Ideally, give red wine at least a week of strong sunlight. You'll get a dull, faded orange background with a very soft pink-red subject. I do not recommend red wine as an anthotype dye because of the incredibly pale colors produced. The visibility and contrast is quite poor. However, it is fairly consistent and easy, so people just starting out may want to try it for themselves before moving on to more complex dyes.
No comments:
Post a Comment