As I've mentioned many times before, one of the final stages in most of my alternative process work is scanning the print to create a permanent, digital record of the image. Many of my prints are unstable for various reasons, so the digital record is often the only way to get a permanent end product. Anyone that wants to be an active part of the artist community in this day needs to scan or somehow digitally image their work, regardless of medium. It's just a fact of life. Your digital images can travel far better than your prints can.
There are some drawbacks to scanning prints, though. The first is one I've already addressed: dust. You have to clean and spot the digital image before using it. It's time-consuming and difficult, but no more so than having to clean and prep a physical print for display. That's kind of a wash, really. What I really want to address today is the difficulty with recording and reproducing surfaces through digital means.
Now, what do I mean by that? Well, a few things, but kinda one thing. Surface matters a great deal to any printed medium. Photographic papers (inkjet or darkroom) come in a wide variety of surfaces. Matte, semi-matte, satin, pearl, luster, semi-luster, gloss, high-gloss, super-high-gloss, etc. That's just a fairly standard range. There are ultra-mattes, watercolor surfaces, cotton rag surfaces, etc. Alternative processes expand that even further by allowing access to essentially the full range of all possible paper surfaces. Even just exploring high-quality fine-art papers offers dozens or hundreds of different levels of surface smoothness, texture and feel. The choice of what surface you print on has a tangible impact on how your image feels to the viewer.
Basically, if you're going to be reproducing your work digitally, the original substrate's texture is largely lost. What remains just becomes visual, losing the tactile quality. If your original print was on watercolor paper, you can't recapture that texture perfectly; even printing on watercolor paper won't work. The tactile texture has been translated to visual noise by the scanner or camera and will be translated into ink by the printer. It's generally not a pleasant result. The original texture, translated into the digital image, looks like nothing more than distortion. It doesn't have nearly the same effect as actual, physical surface texture with true dimensionality.
There are other problems with scanning images. Certain things just don't photograph well. Metallic reflections, fabric textures, anything that shifts appearance based on perspective... some of my favorite lumens look disappointingly dull and disinteresting in their digital forms because the strongly reflective metallic highlights created by silver deposits in the paper brought to the surface by moisture just don't show up. They show up as blue or grey, with no shine at all. Chromoskedasic sabattier, which forms similar highly metallic deposits in a variety of oil-on-water shimmers, scans even worse. The results often appear as dull black shadows instead of glittering patches of light.
I've tried printing on different surfaces to reproduce the original surface, but the problem is the secondary visual texture created by the scan. My only real solution to this issue is to use smooth-textured original surfaces so there is no transfer. Then whatever texture I want to integrate can be applied when I print from the digital file, by printing onto a textured surface. Only one layer of texture, see? It works, but it isn't ideal. That offers no way to deal with metallic surfaces like chromo prints or collodion-paper lumens. It offers no way to help with cyanotypes or other alternative processes printed on leather, parchment, cloth or heavy, textured paper.
The only suggestion I have for those is just not to even attempt to reproduce the image as itself, but rather accept that the digital 'copies' aren't copies. They're documentation of a unique original, just like prints of a Van Gogh or photographs of a sculpture.
Thursday, April 24, 2014
Tuesday, April 22, 2014
An Alternative Approach
 |
| Pre-washed & sun-dried suede leather test swatches |
Since my experiments with cyanotype on leather have stalled out, I've got to find another purpose to put these hides to. I have 8 whole skins left, and one sliced into about 10 smaller sections. So, what else do I do with this stuff? Well, anything that requires washing is made vastly more difficult on leather, so lumen prints with Liquid Light are out. That leaves me with anthotypes, which require no water at all.
 |
| Annatto-dyed leather suede swatch |
There is a nice kind of naturalism to making anthotypes on goatskin. Just natural ingredients, no chemistry. Only plant-sourced pigments and soft hide. We'll see what sort of detail I can get from the process... in a week or two. The skin takes a while to dry and I don't want to put it out wet, lest it molder or rot.
Monday, April 21, 2014
What to do with Blue Suede?
 And no, I don't know how to make shoes. There probably isn't enough suede to make shoes, and it's too thin anyway. Anyway, my first experiment with printing cyanotype onto leather didn't work out. I should have noticed something was wrong because as soon as the chemistry was applied to the suede, it turned dark blue. I figured that might just be because it was so saturated, but the chemistry itself is greenish and normally paints onto cloth or other surfaces as a yellow stain, not a blue one.
The end result was that today I left the skin outside in bright sunlight for several hours, with a large branch over it to cast shadows. Nothing happened. The skin somehow developed itself during the coating process. When I washed it off, hoping for some patterning from the exposure, I found nothing. Well, no patterning. I did find that the skin produced an awful lot of suds, which was odd. I had not cleaned or soaped it prior to coating. I got it shipped to me, pulled it out of the package and coated it. That means there must have been some kind of chemicals left from either the tanning or the cleaning process at the tannery left in the suede.
I can only assume those chemicals reacted with the cyanotype material and caused it to develop instantly. No idea what else could have happened, since I coated a ton of parchment with the same chemistry, at the same time, in the same light. The parchment's fine! So now I have a second skin in the washing machine on a delicate rinse cycle to get out any residual chemistry. Then I'll run it in the dryer and see what happens with that.

As for the blue suede, it's being annoying. Rinsing the chemistry out of it is taking a very, very long time and many, many washes. Basically the thing is a chamois, so it being incredibly absorbent is no surprise. The sheer amount of chemistry locked in there, though, is distressing since it was all basically wasted.
For further experiments, I'm going to cut the pre-washed skin into sections. I'll then try painting a dilute glue solution onto one and a gelatin solution onto another. Hopefully this kind of sizing will reduce the amount of chemistry involved in creating a print on the material, and make the washing cycle much faster. We'll see how it goes.
What will I be doing with this blue-dyed skin? Well, I'm going to keep it. I'll use it as backdrops for some small object photography.
Thursday, April 17, 2014
Blogging for Thor: Where Am I Gunna Hide This?
 |
| My first coated skin! Good thing I had that board. |
Eventually I'll have to buy a new board, because the rest of the "splits" are too wide for this one. Dealing with the size of them is an issue I'm gunna have to work around. It'll have a big influence on my choice of objects to print onto the skins, and that size issue is going to mean I can't apply glass to keep the objects in contact with the chemistry. That'll have an effect on the clarity of the resulting image. I'm actually still trying to figure out what to print on here, but considering how long I expect it to take to dry, I figure I'll come up with something before it's ready.
Washing the skin is going to be interesting, too. I've never tried wetting this material, but it basically feels like a chamois, so I hope it'll dry without too much distortion. I'll probably just wash it in the sink, then re-stretch it on the board to make sure it dries flat and un-wrinkled. I contacted the tannery to ask if there are any special techniques for washing it to keep it undamaged, and looked online for suggestions about cleaning leather suede. So far nothing specific, but I hope to hear back from the tannery soon.
The hide sucks up chemistry like a sponge. I went through about 300 ml of working solution to cover this smallest skin, which is crazy. I was expecting it to take a lot of chemistry, but not that much. The parchment I'm used to dealing with takes a lot of chemistry, but I'd get a single stroke of the brush before it went dry. I'm probably going to need more chemistry to do the rest of them, but the first one is a test. I'll update with results one I get the thing dry. I anticipate it will take a long time, considering how much chemistry soaked into that skin. This is so exciting! I've been wanting to do an entire cyanotype hide since I got my first parchment scraps!
EDIT: I researched and the stuff I bought is called a "split" because it's only part of the entire hide. The tanners split the hide into different layers, and this stuff is created from some of the lower parts, which is why it's suedey on both sides. Cool!
Tuesday, April 15, 2014
Blogging for Tyr: Tears of Failure
So, I missed not only Thursday but also Friday, Saturday, Sunday and Monday. I've managed to let down Freya, Saturn, Sol Invictus and Luna all in one go. Awesome. But basically, I just didn't have a good post. I still don't, but I'm working on one and this week will be a double-serving to make up for last week's absence.
It isn't that I don't have topics or outlines, I've got a few saved drafts with roughed out articles, but I just couldn't finish any of them. I guess between taxes (my returns are weird this year and I'm worried I did them wrong) and the end of the semester (tons of grading, and some of my students just suck) I've been feeling pretty low recently. Not real conducive to writing good articles, I suppose.
Maybe another factor was that my April 1st post, about a fast way to remove dust from scanned prints, was the most viewed article I've ever posted. It got 300+ hits in one day, which is crazy for my blog. Normally it's just me and the spiders (hi spiders!) but that one seemed to really get some attention. I started getting wound up about what I could write on in order to keep getting viewers and forgot that I'm doing this blog mostly for myself. It's my headspace and, sure, it's great when people get to learn from it and take away something they maybe didn't know before, but that isn't everything. I just gotta keep writing about things I love, or else I'll start to hate blogging and that'd be terrible.
That said, seriously, if anyone knows how to publicize an alternative photography blog and get it out to a bigger community, let me know. I'm terrible at social networking.
Friday, April 4, 2014
Blogging for Thor: 200 Lumen Slog

Liquigrams as I've been calling them, are a great amount of fun. The only downside is that in order to prevent the stuff on the paper from dripping, sliding and melting all kind of different directions, they have to be exposed to sunlight while kept flat. Since my house is on a hill and halfway surrounded by trees, that's quite a challenge. There's really only three places I can put them, and I only have a few of the plastic trays I make them in (keeps things cleaner). So my production of liquigrams is much slower than my production of regular lumen prints.
On that note, I've got to make a minor note: I'm really slow at lumen prints. I know a few others that work with the process and they tend to have exposures only a few minutes long. They can churn out a dozen or more prints in a day, whereas I'm happy with doing maybe 4 in a day, if I'm lucky with sunlight and at home the whole time. I generally have exposure times that run upwards of 2 hours.
Mid-Post Note: Dammit! I got distracted watching TV and didn't finish this post in time. Oh well, I started it on Thursday!
I'm going to compile a list of which papers I've done Lumens with at some point this weekend, which will be another post. It's my first step towards creating a lumen paper compendium. I also plan on discussing in more detail the results of lumen printing on ortho-litho film, and get into some lumens on regular film, like 4x5 and 35mm.
Tuesday, April 1, 2014
Dustbusting 101
I found a cool trick today in Photoshop. My cyanotypes, anthotypes and lumens all need to be scanned, so I spend a lot of time in Photoshop cleaning up dust and debris. No matter how clean you get your scanner, and how much you wipe and baby the prints, there's always dust and stuff sitting on there. Somewhere. It's always there. And you have to get rid of it in Photoshop. It takes forever, and it's tedious... but there's a faster way!
 The Spot-Healing brush is awesome at spotting. That's what it's for, after all. However, if you have a lot of really tiny dust, it's a pain. There's the Dust &Scratches filter, which is great, but it has the downside of also removing detail. So for a long time, I combined both of them. I ran a fairly low-powered Dust & Scratches filter across the entire print, then cleaned up the big stuff with Spot-Healing. Pretty simple, if extremely time-consuming. The biggest issue was that, even at low power, the Dust & Scratches filter still removes detail. It's especially nasty if you're printing on a textured surface and want to retain details of that surface tooth, because that's one of the easiest things to loose.
 What I realized today is that most dust is lighter than the rest of the image. That's what makes it stand out. So a really, really simple way to get rid of tons of dust all at once is to apply a medium-strength Dust & Scratches filter...then set it to the "Darker Only" blending mode. Holy crap!! It works so well! It takes out virtually all the light dust and specks, leaving behind just a faintly blurred pixel here or there. It's amazing. Then all you have to do is Spot Heal the darker specks, which tend to be far less numerous and troublesome.
 This technique saved me at least an hour tonight, and the results are hands down better than the way I did things before. No lost detail! No having to make tricky masks to restore the detail lost to Dust & Scratches. It's Dust & Scratches that only effects dust!!!
I'm pretty excited, can you tell? CAN YOU, SPIDERS?! Eeee!
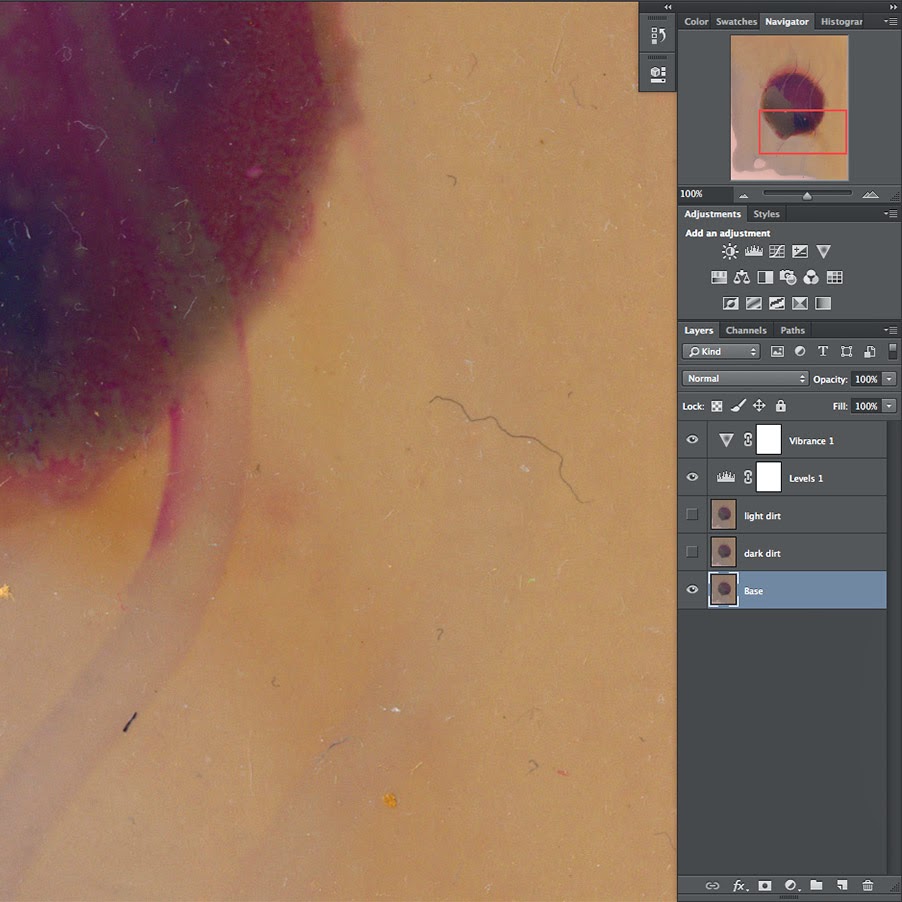
UPDATE: I added pictures! You'll see that I have two dust-removal layers in this example: one is the Darker-Only Dust & Scratches copy and the second is a regular Dust & Scratches copy. That's because I hate doing repair work on my original layer, just in case I make a mistake. I also came across a pretty simple extra step.
You see, if you just do a Darker-Only layer, then a dark dust layer, you have a few nagging spots left over where the Darker-Only Dust & Scratches (DODS!) is still showing that dark dust. This happens because your DODS layer is on top of your DDL (dark dust layer) and if you Spot-Heal away the dust on DDL, you can still see whatever was there on the earlier-created DODS layer. Here are the steps I follow in this dust-removal scheme.
I hope this helps someone else out! All that time spotting is time you could be printing! Or playing games. Or whittling. Or whatever.
The Spot-Healing brush is awesome at spotting. That's what it's for, after all. However, if you have a lot of really tiny dust, it's a pain. There's the Dust &Scratches filter, which is great, but it has the downside of also removing detail. So for a long time, I combined both of them. I ran a fairly low-powered Dust & Scratches filter across the entire print, then cleaned up the big stuff with Spot-Healing. Pretty simple, if extremely time-consuming. The biggest issue was that, even at low power, the Dust & Scratches filter still removes detail. It's especially nasty if you're printing on a textured surface and want to retain details of that surface tooth, because that's one of the easiest things to loose.This technique saved me at least an hour tonight, and the results are hands down better than the way I did things before. No lost detail! No having to make tricky masks to restore the detail lost to Dust & Scratches. It's Dust & Scratches that only effects dust!!!I'm pretty excited, can you tell? CAN YOU, SPIDERS?! Eeee!
UPDATE: I added pictures! You'll see that I have two dust-removal layers in this example: one is the Darker-Only Dust & Scratches copy and the second is a regular Dust & Scratches copy. That's because I hate doing repair work on my original layer, just in case I make a mistake. I also came across a pretty simple extra step.
You see, if you just do a Darker-Only layer, then a dark dust layer, you have a few nagging spots left over where the Darker-Only Dust & Scratches (DODS!) is still showing that dark dust. This happens because your DODS layer is on top of your DDL (dark dust layer) and if you Spot-Heal away the dust on DDL, you can still see whatever was there on the earlier-created DODS layer. Here are the steps I follow in this dust-removal scheme.
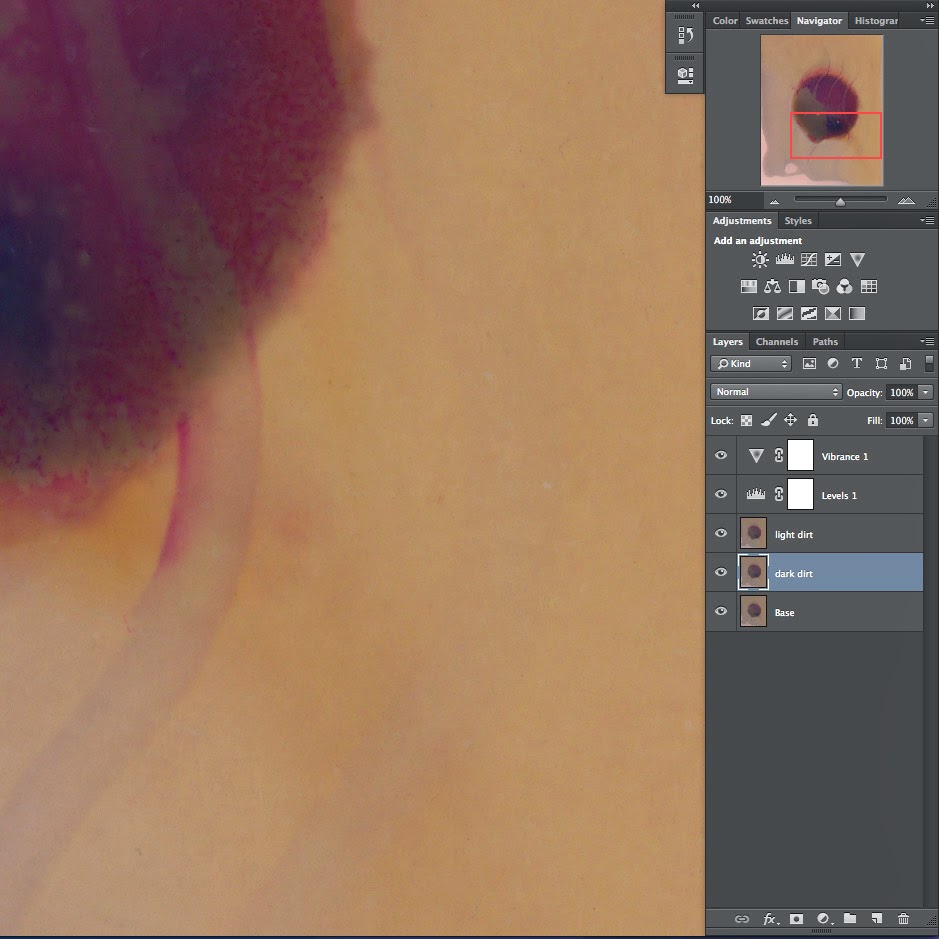
Step 1: Open file.You should now be left with three layers: your second DODS on top, DDL in the middle and Background on the bottom. Theoretically you could save a few steps by creating the DDL and doing all the dark dust Spot Healing first, but I found it much easier to create the initial DODS layer just so that while cleaning up my dark dust on the DDL, I had less distraction. The photo was already so much cleaner from creating the initial DODS layer that it was much easier to identify and remove the dark dust. It only adds an extra few clicks and a few seconds to your time. Still, there's no reason you can't eliminate steps 2 and 3 from my list.
Step 2: Duplicate Background layer to create your first DODS layer.
Step 3: Run the Dust & Scratches filter at low power (generally Radius 2-3, Threshold 1) on your first DODS layer.
Step 4: Duplicate the Background layer again, creating your DDL (dark dust layer).
Step 5: Spot Heal away all the dark dust on the DDL.
Step 6: Duplicate the DDL to create your second DODS layer.
Step 7: Run the Dust & Scratches filter at low power (generally Radius 2-3, Threshold 1) on your second DODS layer.
Step 8: Delete your first DODS layer.
I hope this helps someone else out! All that time spotting is time you could be printing! Or playing games. Or whittling. Or whatever.
Subscribe to:
Posts (Atom)