Thursday, March 27, 2014

Blogging for Thor: Viscous Fluids

I tried new things today! I've been researching the chemigram process since I attended a lecture at SPE by S. Gayle Stevens. The basic idea is that instead of using photo chemistry to develop an image made by light and shadow, you're using that chemistry to directly create an image through the tone and color shifts created by applying the chemistry to activated paper. Using different resists to alter the rate and strength of the reaction between chemistry and paper introduces different shades, and the paper itself can add colors based on further chemical reactions.

So I started thinking, "Well, isn't that just how a lumen print works, except without the photo chemistry?" And yeah, basically it is. So I decided to set out to do some lumen prints inspired by chemigrams. Since they don't use darkroom chemistry, I'm calling them 'liquigrams' but there might actually already be a word for them. I dunno. I Googled for five minutes and didn't find one.

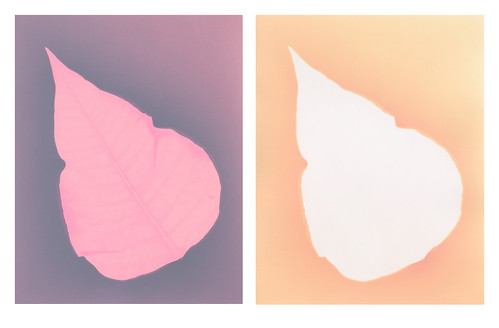
So far, I've made three of these prints. I only have so many basins that I can make them in, and they require a good washing after exposure so they take a bit longer than normal lumens. Still, the weather's been nice and I'm hoping to do some this coming week as well. Today my prints were made using corn syrup, chocolate syrup, orange juice, milk, ice cream salt, maple syrup and strawberry jam. The best results (above) came from carefully planning out what I wanted the final result to look like. Pre-visualization is key, just as with all forms of art.

I strongly suggest anyone wanting to experiment does some tests to figure out which resist will cause which colors. In mine, the chocolate syrup tended to produce pinks and reds, where clear syrups or uncovered paper left the greyish blue. The yellow at the bottom of the above print comes from milk and ice cream salt combined. I got orange-browns where I applied maple syrup. Orange juice did not seem to impart a particular color. Once you know, generally, what kind of colors you can create, you can basically treat this medium like painting. I'm gunna have some fun, let me tell you!

Later this semester I may try involving the chemistry used to create chromoskedasic sabatier effects. I did a workshop (also at SPE) with Angela Wells about that technique and it is really awesome. I'd love to see how it combines with my lumen printing.

There will be two posts this week, because I've also been experimenting with lumen prints on ortho-litho film. I was introduced to the idea by John Fobes, and it shows some promise. That's for later, though. I want to test the technique with fresh leaves... or maybe fluids! Who knows! Anyway, so far my results with that technique haven't been particularly awesome. They require a good bit of post-processing to create strong images, and I'd rather accomplish that in-process.

Thursday, March 20, 2014

Blogging for Thor: Wipeout

I went chasing waterfalls!
Whelp, Spiders, I got nothin'. I took a short vacation for Spring Break this year instead of sitting at home and watching Netflix. So on Tuesday, I picked up my best friend and Wednesday morning we drove out to Asheville. Had fancy beer at a fancy beer bar, took some photos of the French Broad River and some rocks, met some old friends, had delicious Chinese food and then ice cream. Today we explored Asheville's River Arts District, had lunch with another old friend and then went off to chase some waterfalls. Down in DuPont State Forest, we got up close and personal with some big waterfalls and took a five mile hike. It was pretty intense, but I got some good shots.

Overall, it was an awesome two-day vacation. But, those were the only sunny days this entire week. So I have no new alternative processes to show you. I'm also way too tired to write up a Teaching post or anything else in-depth and crazy. Sorry, Spiders, I'll have to make that up some other day.

I will plug the Asheville Darkroom, though. The two founders, Bridget and Jason, are friends from SPE and Bridget was the one I had fancy beer with. I'm hoping to get another show up in their gallery space sometime in the future and give myself another reason to head back up there. The Darkroom is open to the community and a great resource. Bridget and Jason both teach classes there, keeping the love of chemistry (woo!) and film (eugh) alive.

Thursday, March 13, 2014

Blogging for Thor: So That's What That Is!

Hello spiders, how are we doing this week? Good, good. I'm feeling better too. I had a horrific case of Explosive Stomach Plague over the weekend, but have since mostly recovered. As an aside, why have we foregone cool names for diseases in the modern era? We used to have get lockjaw, come down with the consumption or catch a case of the Black Death. Now we have boring things like 'the flu' and "Somebody's Syndrome". Laaaaame. Which would you spend more money on, a vaccine for 'the flu' or a vaccine for 'Frigid Bones Fever"? Obviously.

Anyway. I finally figured out what this stuff is! It's a weed that grows everywhere in the Southeast. It springs up right around the end of winter and starts putting out these tiny, purple trumpets. It's actually very pretty. I've always loved it because of the bright color and weird shape. If you look close enough, there are bright orange dots inside the purple trumpets, meaning this plant displays a triadic color scheme! Sorry, I had to teach color theory this week. I've never bothered to check into what it's actually called though. Turns out that it's called ground ivy (among other things) and that it's an introduced plant, originally native to Europe. It's sometimes used as a salad green, can be made into tea and was used by the English to make beer before they got hops. So, overall, a pretty cool little plant!

To celebrate the return of (some) sunlight, I made a lumen today, but it wasn't that awesome. I also harvested some of the ground ivy and did a scanogram. I really do enjoy scanograms, and I don't do them often enough. I was working on some using a few dead poinsettias left over from Christmas, but haven't resolved them to my satisfaction yet. This one, though, I'm fairly happy with.


And that's all I have for today! Next week is Spring Break for my students and I'm heading up to Asheville. I hope to bring back some nice photos and things to share.

Thursday, March 6, 2014

Blogging for Thor: My Discontent with Winter

Much to my discontent, it remains firmly winter here in the South. Near-freezing temperatures, grey skies and cold liquids falling from space. It all sucks, my spiders. Get working on the NASA satellite weather-control thing, will you?

Tonight's blog will be brief. I haven't been entirely unproductive recently. Teaching a darkroom class has actually had me in the darkroom. I'm not a big fan, especially since I was basically just watching my students do their thing until I was able to change the policy to get them an open-door lab. One of the advantages of just sitting around while my students worked was that I had time to mix myself up a batch of fixer and test some more lumen papers.

Before and after: Ilford Warmtone
As normal, warm-tone paper (I got a pack of Ilford Warmtone for my birthday back in December) continues to be really awesome when fixed. The relatively boring purple of pre-fixer changes to a nice gradient of red-golds. So far, since everything is dead and dry, I have not been able to test the effects of moisture on the Ilford Warmtone, but I look forward to doing that during spring.

The second paper I tested was the Harman Direct Positive, which is bubblegum pink when taken out of the pack and exposes down to a dull slate-grey. It takes forever to expose, several days which is unheard of for a lumen print. When fixed, anything that stayed pink just washes right off and goes to pure white, but the grey areas turn a very soft, pastel peach. I think it might be worth pushing this paper further to see what can be achieved there.
Before and after: Harman Direct Positive

I also experimented with fixing some of my Liquid Light lumens that were made on metal, glass or animal skin. The results weren't as cool as I hoped. When fixed, Liquid Light goes from a dull purple-grey to a dull tan. It's not very exciting. I'm having trouble scanning them, because the fixer bath and rinse left them very delicate and extremely warped. I may have to photograph them.