In the last big series of posts, Rainbow Reverie, I collected notes and examples about most of the the various forms of anthotype dye I've experimented with. I've figured out at least one good dye for every color except red and I feel pretty good about that. Almost as important as what substance you use to create your dyes is the method you use to extract the pigment from the original material.
There are a lot of different ways to do this and each one has its ups and downs, so I'm going to cover the most common methods. Hopefully this won't be a very long post, but it should be helpful.
Blending
Use a regular blender (not one you use for food) to puree the substance and render it down into ooze. I suggest adding either water or alcohol to dry substances (leaves, twigs, dried berries, etc) so you don't burn out your blender. Don't add too much or you'll dilute the dye, but just enough to make sure the matter in the blender is reduced to a soup. This is my default method for extracting dye because it retains all of the object, including fruit skins which often have a lot of pigment in them. It also doesn't induce any chemical changes as boiling might.
Once you've blended the base matter down to a soup, you can choose to either use that soup directly as a dye or further reduce it. Reduction will be covered as its own method of extraction below because it tends to change the final dye a good bit. Keep that in mind. For comparison purposes, blending is simply that: tossing the dye-matter into a blender, adding fluids if required and using the resulting paste/soup as a dye.
Mixing
This method is only suitable for powders such as turmeric, woad, indigo, alkanet and madder extract. The idea here is that you take your powder and add alcohol or water to it in order to produce a fluid of whatever viscosity you want. The thicker the paste, the stronger your color will be. When working with powders, I find this simple method to be the best. It doesn't provoke any chemical changes, it's fast and it's simple. Why mess with a good thing?
Pay attention to your level of dilution and what you use to dilute the powder. Water will take longer to dry and give weaker colors. Alcohol dries faster and gives brighter colors, but leaves behind a lot more pigment that can collect on the surface of your paper and end up as loose dust. Trying to remove this loose dust can end up staining the whites of your paper.
Boiling
I have read many guides to anthotypes that suggest boiling your dye-matter before trying to extract the color. This seems to be a hold-over from textiles procedures where heat is actually required to cause many dyes to work. This is not true for anthotypes!! The heat helps the dyes work if they need to absorb into fibers. We don't want the dye to absorb into the fibers of the paper, that makes it harder for light to break it down. Boiling seems to break down the pigment in a few organic dyes, making them duller. I have also noticed that boiled dyes take much longer to expose. This could be due to the pigment already having been degraded by the heat or some other chemical reason. I'm not sure, I'm just reporting my findings.
I Do Not Recommend Boiling. It's rarely worth the time and effort involved, but there are a few dyes that just don't work without boiling. Mostly these are going to be dyes borrowed from textiles, like madder root. In order to extract the alizarin pigment from madder roots, you have to boil the roots. I find it much easier to simply buy extracts instead of the raw plant, but if you enjoy going through the extra steps, you're welcome to.
Your method of boiling will vary based on each dye you use. The basic idea is to use as little water as possible and watch very carefully to avoid your dye boiling dry. You'll end up with a brightly-colored soup, but the liquid is much more impressive than its stain results. Please, don't judge a dye by its color.
Filtering
This can be considered a Step 2, because it can be used on a dye obtained through blending, mixing or boiling. The idea here is to remove as much extra matter from the dye as possible to reduce the amount of debris or residue left from the dye-matter and get a pure liquid dye. You can use cheesecloth to filter thick pastes like blended berry or leaf mixtures but for the powder-based dyes you'll need to use something like a coffee filter to get the extra powder out of your dye. You can double-filter thicker mixtures, first using cheesecloth and then running the resulting liquid through a coffee filter for extra clarity. I've found this can be quite helpful because the cheesecloth (maybe mine is old?) lets a lot of material through.
Be aware! Filtering your dyes will make them less vibrant. They'll be very pure colors, but not very saturated. You'll get rid of all the residue and debris, but sometimes those impurities can result in some very interesting textures in the paper. I suggest filtering half of any batch of dye so you can do a side-by-side comparison and figure out if you prefer the filtered result with the unfiltered result. In a few cases (please consult Flickr for more details), filtering your dyes can change the color entirely, which is another good reason to only filter half your batch and do a side-by-side.
I think the next post will probably be about the different ways to apply your dye to a substrate and maybe touch on substrates themselves? That might be two posts. Who knows?!
Friday, December 21, 2012

Tuesday, November 27, 2012
Rainbow Reverie: Violet
Violet is a very easy color to produce for anthotypes since many of the things that make violet are cheap and easy to buy. There are only a few actual dyes, but there are several ways to prepare each one.
Alkanet: This root is typically used as a textile dye. It interacts with pH values to produce a varying range of blues and purples. I wasn't interested in exploring it for use as a blue dye, so I used high concentrations of the powder and used baking soda to alter the pH of the alkanet-alcohol mixture. Without any soda, alkanet provided a red-violet color. With the soda added, the color shifts to a dull violet, adding a lot of blue. So far, I haven't gotten any results from exposure. I'm expecting the alkanet will take a long time to exposure because the dye is noted as being quite light-fast.
Blackberry: Probably the most flexible source of purple dye for anthotypes, blackberries can be used many different ways. If you just crush the berries and strain the juice without any dilution at all, it provides an intense, Barney-like violet. Diluted, the color is softer but the exposures are shorter. If you boil the blackberries before squeezing them, the color will be darker. If you filter the boiled blackberry, it reduces the darkness and shifts the color closer to a red-violet. As usual, boiling the dye will slow your exposure times and in general produce less useful results.
There are lots of possibilities and all of them give good results. Generally under a week for your exposures. Also note that blackberries respond well to moisture in the exposure, sometimes creating interesting halos if fresh plants are used and the exposure frame isn't sealed up tight.
There are so many permutations of blackberry, I'll just link my Flickr dye tests.
Blueberry: Now blueberries are right and pretty, but not the best dye. Don't try to boil the blueberries, you'll destroy all the pigment. Boiled blueberry dye produces almost nothing at all. Just straight puree is best; don't dilute the mixture with alcohol. If you rough-filter the puree with cheesecloth or a strainer, you'll get a dark blue-violet. Using a finer filter like a coffee filter will give you a truer purple and a lighter color, with faster exposure times. Overall, blueberry is pretty fast. Expect under a week in strong light to give good exposures. The field will fade to a bluish-brown.
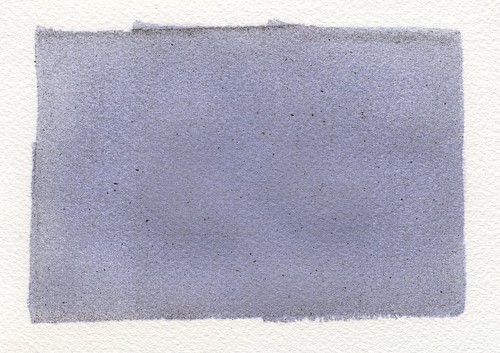 |
| Alkanet with Soda test |
Blackberry: Probably the most flexible source of purple dye for anthotypes, blackberries can be used many different ways. If you just crush the berries and strain the juice without any dilution at all, it provides an intense, Barney-like violet. Diluted, the color is softer but the exposures are shorter. If you boil the blackberries before squeezing them, the color will be darker. If you filter the boiled blackberry, it reduces the darkness and shifts the color closer to a red-violet. As usual, boiling the dye will slow your exposure times and in general produce less useful results.
There are lots of possibilities and all of them give good results. Generally under a week for your exposures. Also note that blackberries respond well to moisture in the exposure, sometimes creating interesting halos if fresh plants are used and the exposure frame isn't sealed up tight.
There are so many permutations of blackberry, I'll just link my Flickr dye tests.
 |
| Blueberry, filtered fine |
Monday, November 19, 2012
Rainbow Reverie: Indigo
Indigo isn't a real color. Check back for Violet soon. Isaac Newton just wanted there to be 7 colors to fit with numerology. 7 days of the week, 7 notes in a musical scale, etc. Indigo isn't real.
'It is customary to list indigo as a color lying between blue and violet, but it has never seemed to me that indigo is worth the dignity of being considered a separate color. To my eyes it seems merely deep blue.' -- Isaac Asimov
Rainbow Reverie: Blue
Blue was not a color I expected to be able to get from anthotypes. I've found one really good dye and two that are alright, but definitely not as good as I had originally hoped.
Indigo: An extremely ancient and well-known natural blue dye, indigo has a complex chemistry and needs a whole lot of additives to function properly. Still, the indigo powder itself is a bright blue and I had hoped that it would stain the paper pretty well. It did produce a strong color, but it's just barely blue at all. The actual color is a dirty blue-grey with a strong yellow undertone. No data on exposure times yet.
Red Cabbage: A very simple and easy dye, if a little deceptive. Red Cabbage produces a bright violet liquid after you run the leaves through a blender with some alcohol. If you boil the leaves in water, then you'll get a much paler purple. Despite the liquid being purple, the stain is a bright blue. As usual, the stain created from alcohol is much brighter and stronger. Possibly because of the poor autumn sunlight, my exposures are averaging around 1 week, but the contrast is very nice.
Woad: Like indigo, Woad is a long-standing textile (and skin) dye. Also like indigo, Woad requires some work to function properly. It does best in an anerobic environment, which was not something I had any intention of trying to create. Fermentation vats are fine for fibers, but not for anthotypes. Still, the powder was a nice color and I tried it just mixed with alcohol. The resulting color is a gunmetal blue-grey kind of like old jeans. There's a lot of grainularity in the color. I tried filtering the mixture, but that didn't work. The resulting liquid was thin and violet, leaving little color behind. Still waiting on exposure data for woad, but the base color is interesting.
 |
| Indigo Dye Test |
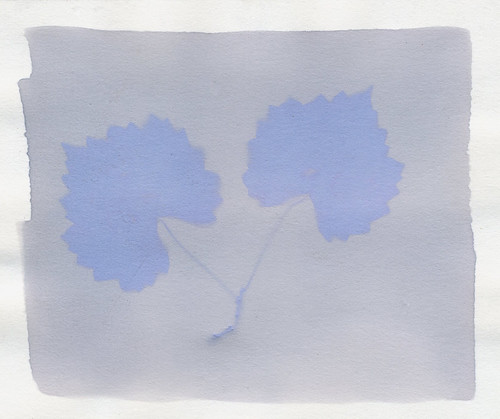 |
| Red Cabbage Anthotype |
 |
| Woad Dye Test |
Woad: Like indigo, Woad is a long-standing textile (and skin) dye. Also like indigo, Woad requires some work to function properly. It does best in an anerobic environment, which was not something I had any intention of trying to create. Fermentation vats are fine for fibers, but not for anthotypes. Still, the powder was a nice color and I tried it just mixed with alcohol. The resulting color is a gunmetal blue-grey kind of like old jeans. There's a lot of grainularity in the color. I tried filtering the mixture, but that didn't work. The resulting liquid was thin and violet, leaving little color behind. Still waiting on exposure data for woad, but the base color is interesting.
Monday, November 12, 2012
Rainbow Reverie: Green
Anthotypes are a pretty green process; they don't use any caustic chemicals and no heavy metals. In most cases (and all cases for me, personally) they don't even use any artificial dyes. Natural plant products and alcohol are all that go into making the 'chemistry' used for the process. The exposure is sunlight and there's no development process or fixing at all.
That's all well and good, but today we're talking about a different kind of green. At I thought that green pigments for anthotypes would be really easy to come by; plants are green, right? Well, I tried just throwing green leaves, cut grass and shrubbery into the blender and making prints with the resulting muck. Nothing. There just wasn't enough pigment in most leafy bits to generate a lasting dye. Considering how hard it is to remove grass stains from clothing, I think there might still be potential there and the grass I was using was just too dry and dead. Very real possibility considering the lawns around here.
So, there was despair. Later, I was able to track down some potential subjects and tried them out. I've actually had a lot more success than expected! So, here are the green dyes that I've tested and the results.
Swiss Chard: I found some folks working with this dye on Flickr and they'd gotten pretty good results, so I gave it a try myself. Boiling the chard leaves and using the water left over will give you a stain, but it's weak and pale, almost brown instead of green. Once again, I don't recommend boiling your anthotype dyes. When I stripped the leaves off the chard and simply tossed them in the blender with water (first) or alcohol (second test), the results were much stronger. Chard gives you fairly yellow greens, but they're bright and exposure times are nice and short. After 3 days you can expect the field of your anthotype to have faded to a tan and the image to remain a bright green.
Spinach: Before I came across chard, I tried spinach. I will be trying it again in the future, but the plant is closely related to chard and I don't expect the results to differ very much. My original results from spinach produced a stain so faint it was almost invisible before exposure and after it was exposed the result needed extensive post-processing to even be seen.
Spirulina: Fairly cheap to purchase, you can get spirulina at your local health store because it's some trendy new part of a healthy diet. Lots of plant-protein or something. For our purposes it's a dark green powder that readily dissolves in alcohol and will give you a smooth, bright green that hasn't got much yellow or blue to taint it. It's also pretty fast; exposures will vary but should be less than 4 days.
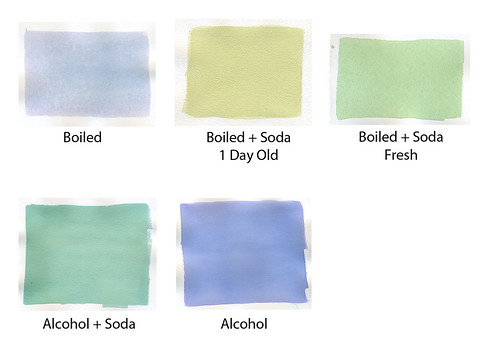 Red Cabbage: The color of the liquids here is pretty deceptive, and red cabbage is a dye that needs some fiddling to produce the colors you want. Baking soda (alkali) will alter the color of the liquid and the stain. I haven't tried acid, but that's on my to-do list. The raw liquid obtained from pureeing the cabbage leaves is bright violet, but dries down to a nice summer-sky blue. To get a green, you'll add the baking soda to your filtered liquid, which will turn bright blue. The blue liquid will produce a nice sea-green stain. If you use alcohol to dilute your cabbage, the color that results will be bluer. Using water gives you a more green cast. This gets a little complicated, so there's a chart!
Exposure times for red cabbage, no matter the color, are on the heavy end of the scale, at least a full week. This may be due to working in the autumn instead of the summer. The brighter greens may require a bit of tweaking in Photoshop to give the best detail; there are similar issues to turmeric and sandalwood with the intensity and brightness of the color hiding some detail. The boiled dyes also did not perform nearly as well as the alcohol-based dyes.
Blackberry: Under normal circumstances, blackberry dye is purple. However, if you dilute the dye at a 2:1 ratio with alcohol, the stain is pale green and provides fantastic detail in as little as a single day of exposure.
Oak Leaves: Terrible idea. Ran them through the blender with alcohol, didn't stain at all.
Grass: Also a terrible idea. Considering how common grass stains are on clothing, though, I think the problem might have been that the grass I was using was just dry and sickly. I might have to talk to some landscaping people at a park or golf course and see if I can get some clippings.
That's all well and good, but today we're talking about a different kind of green. At I thought that green pigments for anthotypes would be really easy to come by; plants are green, right? Well, I tried just throwing green leaves, cut grass and shrubbery into the blender and making prints with the resulting muck. Nothing. There just wasn't enough pigment in most leafy bits to generate a lasting dye. Considering how hard it is to remove grass stains from clothing, I think there might still be potential there and the grass I was using was just too dry and dead. Very real possibility considering the lawns around here.
So, there was despair. Later, I was able to track down some potential subjects and tried them out. I've actually had a lot more success than expected! So, here are the green dyes that I've tested and the results.
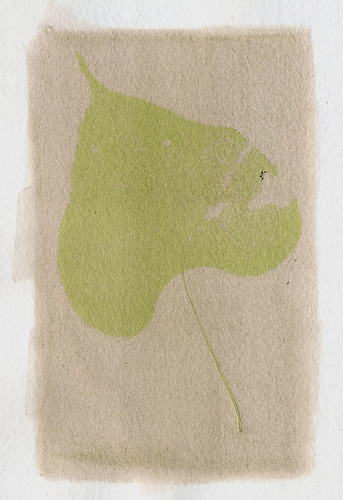 |
| Swiss Chard Anthotype |
Spinach: Before I came across chard, I tried spinach. I will be trying it again in the future, but the plant is closely related to chard and I don't expect the results to differ very much. My original results from spinach produced a stain so faint it was almost invisible before exposure and after it was exposed the result needed extensive post-processing to even be seen.
Spirulina: Fairly cheap to purchase, you can get spirulina at your local health store because it's some trendy new part of a healthy diet. Lots of plant-protein or something. For our purposes it's a dark green powder that readily dissolves in alcohol and will give you a smooth, bright green that hasn't got much yellow or blue to taint it. It's also pretty fast; exposures will vary but should be less than 4 days.
Red Cabbage: The color of the liquids here is pretty deceptive, and red cabbage is a dye that needs some fiddling to produce the colors you want. Baking soda (alkali) will alter the color of the liquid and the stain. I haven't tried acid, but that's on my to-do list. The raw liquid obtained from pureeing the cabbage leaves is bright violet, but dries down to a nice summer-sky blue. To get a green, you'll add the baking soda to your filtered liquid, which will turn bright blue. The blue liquid will produce a nice sea-green stain. If you use alcohol to dilute your cabbage, the color that results will be bluer. Using water gives you a more green cast. This gets a little complicated, so there's a chart!Exposure times for red cabbage, no matter the color, are on the heavy end of the scale, at least a full week. This may be due to working in the autumn instead of the summer. The brighter greens may require a bit of tweaking in Photoshop to give the best detail; there are similar issues to turmeric and sandalwood with the intensity and brightness of the color hiding some detail. The boiled dyes also did not perform nearly as well as the alcohol-based dyes.
 | |
| Blackberry Anthotype |
Oak Leaves: Terrible idea. Ran them through the blender with alcohol, didn't stain at all.
Grass: Also a terrible idea. Considering how common grass stains are on clothing, though, I think the problem might have been that the grass I was using was just dry and sickly. I might have to talk to some landscaping people at a park or golf course and see if I can get some clippings.
Code Red!
As I mentioned in Getting Madder and Madder, I attempted to get true reds from the dye by soaking small samples of paper in each of the most promising dye pots. After two days, I retrieved the paper and dried it.
Success! The madder and chalk mixture had produced what I am comfortable labeling as a 'true red' stain. The other colors produced aren't bad, but I can mimic them through other dyes or application methods.
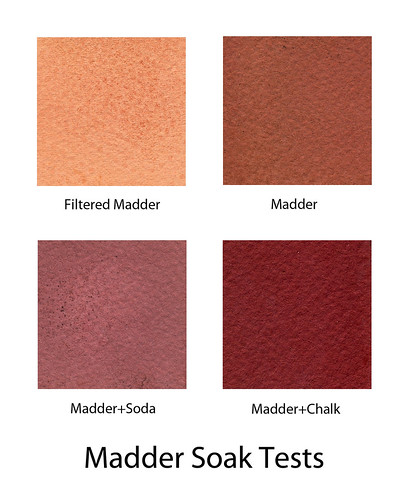 Now, while I am extremely happy to have found a technique that produces a true red, I still have strong reservations about madder root proving to be an effective anthotype material. In all the research I've done, I found that madder root was prized among natural dyes for its light-fastness. That's not a good thing for an anthotype. Light-fastness refers to how well a dye resists breakdown and fading when exposed to sunlight; a very light-fast dye will last a long time without visible fading or discoloration. Since the entire anthotype process is based on using dyes that do break down and fade away when exposed to sunlight, I am afraid that madder root won't give good results.
I still have some hope, because paper holds dyes differently than fabric does and part of the preparation of madder root for a fabric dye involved specific chemicals called 'mordants' which help the dye adhere to the fabric and retain color. Since the best result came from a mixture of madder and chalk, not one of the mixtures that contained alum (a mordant), I still may able to get decent results. The madder might also be affected by both temperature and moisture. When spring rolls around again and I get bright sun and high temperatures again, the results may improve.
There will be a test (already have sheets of paper soaking) to see what can be done during the autumn months, but as I said: expectations are currently low. If a nice result is obtained, that's awesome, but I don't want to build myself up hoping for poppingly red anthotypes only to get a month-long exposure time for a low-contrast, blurry image.
Success! The madder and chalk mixture had produced what I am comfortable labeling as a 'true red' stain. The other colors produced aren't bad, but I can mimic them through other dyes or application methods.
I still have some hope, because paper holds dyes differently than fabric does and part of the preparation of madder root for a fabric dye involved specific chemicals called 'mordants' which help the dye adhere to the fabric and retain color. Since the best result came from a mixture of madder and chalk, not one of the mixtures that contained alum (a mordant), I still may able to get decent results. The madder might also be affected by both temperature and moisture. When spring rolls around again and I get bright sun and high temperatures again, the results may improve.
There will be a test (already have sheets of paper soaking) to see what can be done during the autumn months, but as I said: expectations are currently low. If a nice result is obtained, that's awesome, but I don't want to build myself up hoping for poppingly red anthotypes only to get a month-long exposure time for a low-contrast, blurry image.
Saturday, November 10, 2012
Flickr off? Flickr ON!
In addition to using this blog to record my alternative process experiments, I also scan my results and post them on Flickr with detailed notes. I like putting a few pictures on here, because pictures are pretty, but there are far more of them waiting in the wings. If you're interested in more information, you can check out these links!
Anthotype Dye Tests -- the Flickr Gallery where I store all my un-exposed dye swatches and master sheets for comparison and reference.
Anthotypes -- here are the final results of all my labors, the actual prints created by all this anthotype research and experimentation. Many of these are adjusted in Photoshop, but I'm fairly sure I marked all those as 'post processing' and there are numerous examples of before-and-after comparison to show just what kind of editing I do. I might love alternative processes, but I think the digital age has a lot to offer.
Photostream -- I also have galleries of my Cyanotypes and Cyanovellums, my Lumen Prints and a few other odds and ends. Feel free to browse around!

Anthotype Dye Tests -- the Flickr Gallery where I store all my un-exposed dye swatches and master sheets for comparison and reference.
Anthotypes -- here are the final results of all my labors, the actual prints created by all this anthotype research and experimentation. Many of these are adjusted in Photoshop, but I'm fairly sure I marked all those as 'post processing' and there are numerous examples of before-and-after comparison to show just what kind of editing I do. I might love alternative processes, but I think the digital age has a lot to offer.
Photostream -- I also have galleries of my Cyanotypes and Cyanovellums, my Lumen Prints and a few other odds and ends. Feel free to browse around!
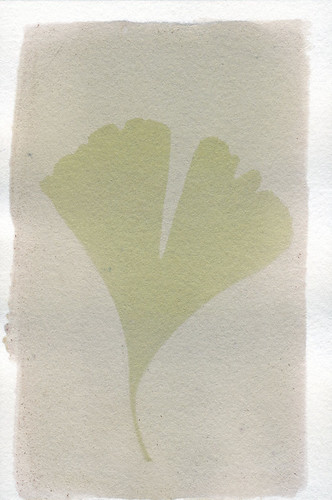
I end this post with a pretty picture.

Subscribe to:
Posts (Atom)