I don't enjoy feeling like a hipster, but I end up feeling that way quite often. Talking to non-specialists about my work is often not an enjoyable experience. When I say I'm an artist, the natural question is what kind of art I make. So I explain that I'm a photographer. Their eyes light up! Photography! That's something anyone can do! It's so easy and relatable! They do photography! They have a camera, they take pictures. They understand me!
What kind of photography do I do, they ask, eagerly. That's where it stops. They expect an answer like "landscapes" or "portraits." Instead, I do alternative processes. Not even 'normal' alternative processes like wet plate collodion, which at least uses a camera. Nope. I use lumen printing and anthotypes, which even most photographers have little or no familiarity with. My subjects are leaves and flowers, but they aren't rendered in the familiar way. My work isn't accessible.
So what can I do? I explain that I do alternative process work. Blank stare. I say some words like "contact printing" and "cyanotype" or "non-silver processes"... and more blank stares. At best, there's a flicker of interest and maybe they ask how it works. Another stab in the gut. Explaining alternative processes has two possibilities.
1) An in-depth explanation of light sensitive materials, chemistry, paper treatments and different printing materials. This often results in vacantly blank stares.
2) "It's magic!" Which often results in laughter (forced or real) or in slightly offended looks. It's just one step above the true hipsterism: "You wouldn't understand it."
I have had some interesting discussions with regular (anyone who isn't an alternative process photographer) people about my work. I've had fun talking about my work with them, but it's a halting, slow conversation and far more often I find myself trying to avoid discussion about my work because of previous experiences.
It's just something that bugs me. I get people that say my work is colorful, pretty and interesting. I get compliments and questions, I do. I like that. I love doing my work. It's just a bit of a bummer that the stuff I really love, the chemistry, the records, the experiments, the trials... that's not something I can have easy discussions about. So for all you academics out there looking for someone to talk about pre-Roman Gaulish culture, or the architecture of ancient Sumeria... I feel for you. I really, really do.
Also, I totally love ancient Sumerian architecture. Let's chat!
Thursday, August 14, 2014

Thursday, August 7, 2014
Blogging for Thor: The Life and Times of Salt
 |
| Sensitized salt paper 24 hours after coating |
Wrong.
Even waiting a full day after applying the silver nitrate was too long. I opened the door of the cabinet where I was storing the paper and found this.
 |
| Print on fogged salt paper |
So, from now on, I'll have to dry the silver-coated paper fairly quickly and try to use it the same day. Or at least coat during the evening (as I do now) and use it the very next morning. I might even try using a hairdryer to accelerate the process so I can coat and print within an hour or two. It's just a bit of a bummer that I can't store the paper. Anthotype paper keeps basically forever if it's out of sunlight. Cyanotype paper keeps for a few days before it begins to fog too much. Salt prints, though, just won't keep for more than a few hours. Bummer.
Lesson learned, y'all!
Friday, August 1, 2014
Blogging for Freya: Fiber and Plastic
While it's entirely possible to create a lumen print on non-traditional surfaces by using liquid photo emulsion or an alternative process like cyanotype or salt printing, most lumen prints are made on photographic darkroom paper.
Darkroom photo paper comes in two forms: Resin-Coated (RC) and Fiber-Based (Fiber or FB). There are pro's and con's of both for normal darkroom printing that have been covered in-depth by dozens or hundreds of different photographers. Lumen printing, however, is not traditional darkroom usage. There are some different reasons you may want to work with either RC or FB papers for your lumens.
First off, remember that lumen color profiles vary by the type of paper and, yes, that includes a difference like RC vs FB. Not always significantly different, but different. Some brands might vary to a considerable degree, but all of them will vary at least a bit. So one thing you have to consider when making your choice is simply if you care. Maybe the specific colors you want don't come from RC, or can't be produced on Fiber. In that case, this guide will just help you deal with the downsides of that particular material.
Darkroom photo paper comes in two forms: Resin-Coated (RC) and Fiber-Based (Fiber or FB). There are pro's and con's of both for normal darkroom printing that have been covered in-depth by dozens or hundreds of different photographers. Lumen printing, however, is not traditional darkroom usage. There are some different reasons you may want to work with either RC or FB papers for your lumens.
First off, remember that lumen color profiles vary by the type of paper and, yes, that includes a difference like RC vs FB. Not always significantly different, but different. Some brands might vary to a considerable degree, but all of them will vary at least a bit. So one thing you have to consider when making your choice is simply if you care. Maybe the specific colors you want don't come from RC, or can't be produced on Fiber. In that case, this guide will just help you deal with the downsides of that particular material.
Friday, July 25, 2014
Blogging for Freya: Salting Spiders, Part 2
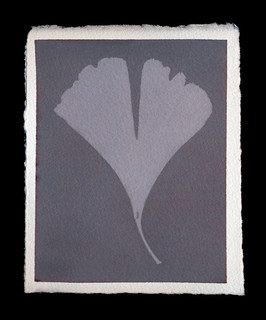 |
| Print made with lite salt |
Set-up
You can do this process almost anywhere, but you're going to need a flat area to work. If it's an area you care about, first cover it in a plastic tablecloth or protective sheeting. The plastic prevents the nitrate from soaking through a towel and getting on anything important. However, the nirate can slide around on plastic, so to be extra super careful you could put towels or a cloth down on your plastic.
Make sure you have your gloves (to avoid black spots on your nails and hands) and your protective glasses (to avoid eye damage) in place. You don't need to actually put them on until you take out the silver nitrate. I don't 'suit up' until I'm ready for the silver nitrate coating, because the gloves make my fingers clumsy. I always wear my glasses, because without them, I can't see. I have little plastic additions to my glasses that clip on to provide extra eye protection. Goggles just fog up on me and hurt my face. Whatever method you use to protect your eyes is up to you, but it is kinda important.
And that's it, you're ready to go. Protect the area, protect yourself, and get ready for some printing!
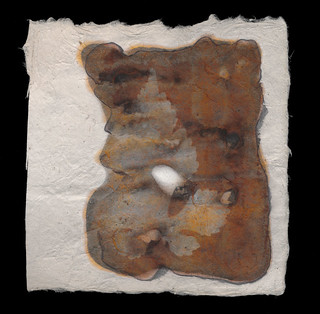 |
| Print on Lokta Fiber Paper |
Select your paper. As with most alternative processes, you want a high-quality printmaking or watercolor paper. I've had great luck with Arches Aquarelle and Rives BFK. Others have recommended Crane Kid Finish, Bienfang or pretty much any cotton rag paper. If it works for cyanotypes, anthotypes, van dykes or other alternative processes, it's probably great for salt prints.
Personally, I prefer smooth surfaces with just a bit of tooth. Too much texture in the paper and it starts removing detail from your print. Too smooth a surface just looks bland to me. I like a nice medium. Hot press papers are generally great for this.
You generally don't need to size your paper, but a simple gelatin sizing may be helpful if you are experiencing significantly less contrast than you expect or desire. To do a gelatin sizing, simply mix up unflavored gelatin (Knox seems the most common brand around here) in hot water and soak the paper in it. Allow to dry completely, then proceed to the next step.
Small note: handmade papers or exotic papers may be too absorbent to use for this process without sizing. I attempted to use some Nepalese lokta fiber paper and it's basically just a rag made of cellulose. I wasn't able to spread the silver nitrate at all and ended up using way too much of the chemical because it had to absolutely saturate the paper. If I experiment again with this paper, I'll be using sizing. I had similar issues with cyanotypes and anthotypes on hand-made paper using dryer lint and shredded recyclables.
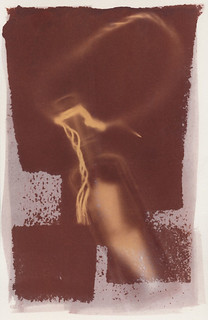 |
| Print made with sea water |
You'll need to make some salt water. The amount of salt in the water is entirely up to your discretion. It's perfectly viable to use seawater. Normally I add about 2 teaspoons of salt to a liter of water. Less than a 2% salt solution doesn't give very much of an image at all. That's basically the minimum required. I have been told that the more salt you add, the more contrast you'll see in the final image. I have not seen a significant difference myself.
You can use chemical grade sodium chloride (additive-free salt) and distilled water. There's no need to use pure chemistry, though. I don't use distilled water. I generally use tap water that I know is absolutely not pure. The pH is on the basic side, it's hard water with a lot of calcium and iron. It works fine. Sea water works fine too and who knows what's wrong with that stuff. Rainwater is fine. The type of water you use, as long as it's not actually contaminated with heavy metals or something, won't produce a big difference in your prints. Minor differences, sure, but not huge ones.
The type of salt you use will dramatically affect your prints. I like using "lite" salt. That's a mixture of 50% sodium chloride and 50% potassium chloride. The important part of the salt is chloride, since you're using it to convert the silver nitrate to silver chloride. Silver chloride is far more reactive to light and produces a much stronger image than silver nitrate. How you get the chloride in your paper isn't important to the light-sensitivity, but it is important to the color. I haven't experimented with ammonium chloride, but I know it can also be used for salt prints.
Lite salt produces violet images that, when fixed, turn pale yellow. I have not bothered tracking down any pure potassium chloride to test what it does, but I imagine it has a slightly different effect. My kosher salt images are red to brown before fixing and turn brown or black after being fixed. Prints made with sea water from the Florida coast have produces a nice middle ground
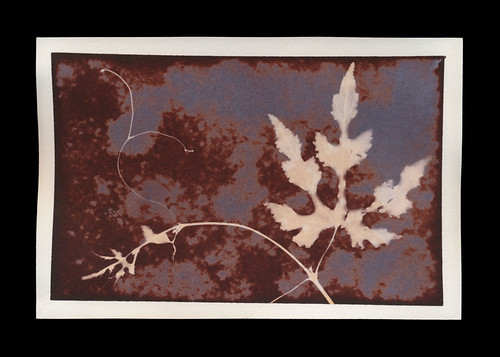 |
| Print made with both lite and kosher salt |
The basic step here is to mix up your salt water and then soak your paper in it. As a faster alternative, you can simply paint the salt water onto the paper with a brush. Either way is fine!
Silver Nitrate
It's time to put on that protective gear! Get your gloves and glasses firmly in place. Once your salted paper is bone dry, paint on your silver nitrate. Do this in low light to avoid fogging the paper or the jar of silver nitrate. I know it's in amber glass, but better safe than sorry. When not in use, the glass of nitrate should be stored in a dry, dark place. I work at night, with a dim lamp or computer monitor as my light source.
Use an eyedropper, pipette or other method to drag a thin line of the 15% silver nitrate liquid across the top of your sheet of paper. Then you can spread it out into an even coating using a foam brush, hake brush, glass puddle pusher or even just a regular flat paint brush.
Getting an even coating can be tricky, because until it exposes, the silver nitrate solution is clear. It can be very difficult to see if you've left any streaks, brushmarks or spots behind. I recommend simply doing two or three light, even coats across the entire surface going in different directions. If you want an especially dark image, you can apply two heavy coats of silver.
Exposure
As with most of my guides, I simply suggest using a picture frame to expose your prints. It's cheap and easy to obtain. Head to your local art supply store, or even the local Target, and grab some inexpensive picture frames that have a hard back. Don't get the really cheap ones with the hinged cardboard back, they're just not sturdy enough to provide good contact between your negative (or object) and the coated paper. I'm going to go into extreme detail on different methods of exposure in a future post.
Since the salt printing process is a "printing out process", it develops while it exposes. You can test exposure simply by looking at a portion of the exposed silver that isn't covered by your negative or objects. When it reaches a density you're happy with (generally dark rusty red or brown), you're done!
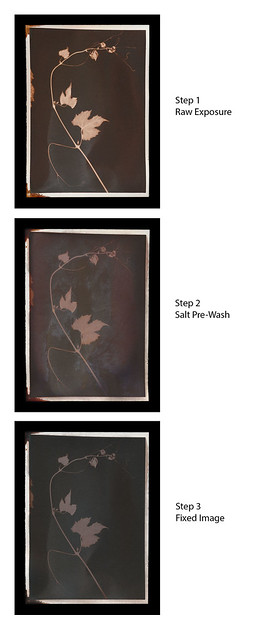
Now, it is possible to simply treat a salt print like a lumen print and avoid fixing it. However, that isn't traditional and the salt print is a very traditional process. It's also a lot more tactile than the lumen print, so I do generally fix my salt prints. An unfixed salt print, like most unfixed prints, will continue to darken and expose in even standard interior lighting.
To fix a salt print, you can mix your own fixer (difficult and annoying) or use standard photo fixer. Guess which approach I favor? That's right, the standard photo fixer. I use Sprint Rapid Fixer, because that's what I can borrow from the university. It's also what I've used for my entire photographic career. I dilute it heavily, about 20ml of concentrate to a liter of water, meaning it's at 20% of the regular working strength. You do not want stronger fix; it will bleach your prints. Even using the weakened fixer, only fix for 1-2 minutes at most. That's more than enough to fix the image. Again, over-fixing will bleach your prints.
Spiders, you should be aware that fixing a salt print does cause a potentially dramatic color shift. I mentioned earlier that the violet images produced by "lite" salt will fix to a pale yellow. The ruddy reds of kosher or regular salt will fix to a duller, darker red or (with high levels of silver) to an almost black brown. I generally prefer the pre-fix image, but not always. So I scan both before and after fixing.
That's all I've got, Spiders. Between this post and the last one, you should be ready to sally forth and print as long as you've got sun, salt and silver!
Thursday, July 17, 2014
Blogging for Thor: Teaching Spiders about Salt
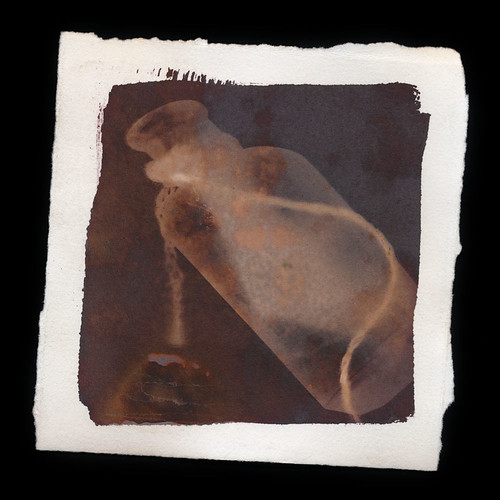 |
| Salt print made during a demo with tap water and fast-food salt packets. It doesn't get any less exacting than this. |
Salt prints aren't complicated. They're also not very dangerous. You can purchase the silver nitrate required in a pre-mixed low-concentration solution. I bought my 15% silver nitrate from Bostick & Sullivan. Here's the link to the specific product I used. 100ml should last a fairly long time, since you only need a single eyedropper full to coat a 5x7 sheet of paper. Each eyedropper is maybe 1ml.
By avoiding powdered silver nitrate, you significant reduce the risks of the chemical. In its dilute, liquid form, it won't burn your skin or get into your respiratory system. It can still cause some nasty harm if it gets in your eyes, but wearing glasses or goggles will protect you. At worst, it will cause stains on counters, skin and anything else organic (including plastics... like plexiglass and acrylic). So what safety gear do you need? Gloves and glasses. The most basic of chemical safety practices will be entirely sufficient.
I am assuming that you use 15% liquid silver nitrate solution. I won't give any details about how to mix the solution yourself, because I never do that. I don't like caustic chemical dust in my house.
Now, onto the actual process! Here's the short, simple version first.
Basic Materials
- Salt (approx. 10-100 grams)
- Water (approx. 1 liter)
- Brushes (foam, hake or flats) or a Puddle Pusher
- Soaking basin or tray
- Jug or glass to mix salt water in
- 15% silver nitrate solution
- Eyedropper
- Rubber gloves
- Protective eye goggles or glasses
- High-quality watercolor or printmaking/drawing paper
- Picture frame or alternate exposure method
- Negatives or photogram objects
- OPTIONAL: Hair dryer
- OPTIONAL: Photographic Paper Fixer (diluted to 25% regular working strength)
Simplified Step-by-Step Instructions
- Gather your materials and set up!
- Mix up a 1-5% solution of salt water.
- Soak your paper in the salt water for at least 10 minutes.
- Dry completely!
- Use the eyedropper to apply a line of silver nitrate across the top of the salted paper.
- Spread the silver nitrate into a thin, even coat with a foam brush.
- Dry Completely!
- Place a negative or photogram object on the coated paper.
- Cover the paper and your negative/object with glass. Real glass, not plexiglass.
- Place in the sun for ~10-20 minutes.
- VERY OPTIONAL: Rinse the print in a salt water bath for 5 minutes to remove extra silver.
- OPTIONAL: Fix the print in regular photo fixer (diluted to 25% strength) for 1 minute.
That's it. That's the entire process! Well... basically. I can, and will, go into a bit more detail. Actually, a lot more detail, my arachnodroid friends. The rest of the write-up is already over 1000 words long and it's still not done. So that's going to be broken off into a second entry. Stay tuned, spiders!
Friday, July 11, 2014
Blogging for Freya: Flickr Failure
Whelp. Looks like I'm being punished for all these late blogs. I'm locked out of my Flickr account, spiders. Whatever password I set up is not one of the standard bases that I use. I've gone through everything I can think of and nothing. I've tried resetting the password, but Yahoo! doesn't just send an email to your registered account. If you can't answer the "Secret Questions" that you created (years ago), then you're screwed. Forever.
And I can't answer the Secret Questions. I know what city my non-existent honeymoon was in, but what my 'favorite book' was way back then? I have no idea. No idea if I actually listed a 'favorite book' or came up with some smart-ass answer that there was no way I'd ever forget. I've forgotten.
So while my Flickr still exists, I cannot upload further images or check any comments or messaged sent to me via Flickr. I'm continuing to wrack my brain, hoping vainly that the password will pop into my head, but so far no go.
This sucks, spiders. It really sucks.
And I can't answer the Secret Questions. I know what city my non-existent honeymoon was in, but what my 'favorite book' was way back then? I have no idea. No idea if I actually listed a 'favorite book' or came up with some smart-ass answer that there was no way I'd ever forget. I've forgotten.
So while my Flickr still exists, I cannot upload further images or check any comments or messaged sent to me via Flickr. I'm continuing to wrack my brain, hoping vainly that the password will pop into my head, but so far no go.
This sucks, spiders. It really sucks.
Wednesday, July 9, 2014
Blogging for Odin: Microwaves are Bad for Skin
Ok, spiders, I don't have a good excuse this time. Or even a bad excuse. I just kept doing other things instead of blogging. I'm sorry. I realize that whenever I say "I'll make it up by blogging twice!" that I almost never do. So I'm just gunna take it and say that, well, I missed last week. You do get two blogs this week, but that isn't a make-up.
I was hanging out with Laurie Schorr (the awesome lady who introduced me to the Light Factory) at her studio this weekend, working on salt prints. Those were a ton of fun, especially because we had just what materials were on hand. There was no measuring, no strict standards, no control. Just a bunch of salt packets from delivery food stashed in the drawer under the microwave, tap water and some plastic cups. We were mostly printing on scraps, everything was hurried along because it was just a few hours of time... and we got some great prints!
But that isn't what I'm talking about today, because I still want to do an amazing post on salt prints and I haven't got it together. I know, I'm terrible at everything. Thanks for the ego-boost, spiders.
Today is about why it's a bad idea to microwave parchment. For some processes, you can speed up drying times by using irons, ovens and microwaves. Nothing bad happens, it's all great. Anthotypes work fine with these, and silver gelatin paper works fine with irons and regular ovens. I don't recommend microwaving silver gelatin paper, though. Normally, you can iron or bake cyanotypes, too. I've even microwaved wet cyanotypes on paper or cloth and had no bad results, but after some consideration, I really don't recommend that either.
Once upon a time, I tried to speed up the drying process for one of my cyanovellums by microwaving the print. The parchment, which is just animal skin, heated up rapidly and contracted into a tiny chip. Originally it was about the size of my palm, but it ended up no bigger than my thumb. The image remains intact, but it's very small, brittle and dense now. Kinda like a shrinky-dink, really.
I kept the shrinky-skin and glued it to a trash print just to provide backing and some surrounding color. It's framed and everything. There's a lesson in there about patience and letting things happen on their own time, but the important lesson is just to not microwave animal skin. It shrinks. A lot.
I was hanging out with Laurie Schorr (the awesome lady who introduced me to the Light Factory) at her studio this weekend, working on salt prints. Those were a ton of fun, especially because we had just what materials were on hand. There was no measuring, no strict standards, no control. Just a bunch of salt packets from delivery food stashed in the drawer under the microwave, tap water and some plastic cups. We were mostly printing on scraps, everything was hurried along because it was just a few hours of time... and we got some great prints!
But that isn't what I'm talking about today, because I still want to do an amazing post on salt prints and I haven't got it together. I know, I'm terrible at everything. Thanks for the ego-boost, spiders.
 |
| cyanotype shrinky-dink |
Once upon a time, I tried to speed up the drying process for one of my cyanovellums by microwaving the print. The parchment, which is just animal skin, heated up rapidly and contracted into a tiny chip. Originally it was about the size of my palm, but it ended up no bigger than my thumb. The image remains intact, but it's very small, brittle and dense now. Kinda like a shrinky-dink, really.
I kept the shrinky-skin and glued it to a trash print just to provide backing and some surrounding color. It's framed and everything. There's a lesson in there about patience and letting things happen on their own time, but the important lesson is just to not microwave animal skin. It shrinks. A lot.
Subscribe to:
Posts (Atom)