I got around to grinding up some blackberries for a new batch of dye. This time, I didn't boil the blackberries, I just blender'd them straight out of the freezer. The boiling seemed to alter the dye's color and properties last time I tried it, so this time I skipped it in an attempt to replicate early successes with blackberry dye.
There was enough of the blackberry puree to split in half: one batch is about 2 parts blackberry to one part rubbing alcohol, the other is the inverse. The blackberry-heavy solution produced expected colors: deep blue-violets that are standing up pretty well to light. I expect long exposure times on those tests.
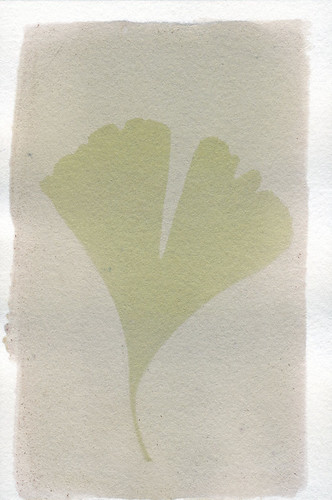
An alcohol-heavy solution, however, proved surprising. The dye is green, as you can see in the test to the left. Much like the alcohol-heavy batches of sandalwood and turmeric dyes, it reacted much faster to light. A three day exposure produced the example seen here. I'll be trying another for five days fairly soon, just to see if I can get some better contrast.
The blackberry-heavy solutions are still exposing.
Just an artist talking to spiders about alternative photographic processes, cyanotypes, bones, leather, anthotypes, lumen prints and how to mix them all together. Updates weekly, for the glory of Thor.
Tuesday, July 24, 2012
Monday, July 9, 2012
Alcohol Makes Things Better! Sometimes.
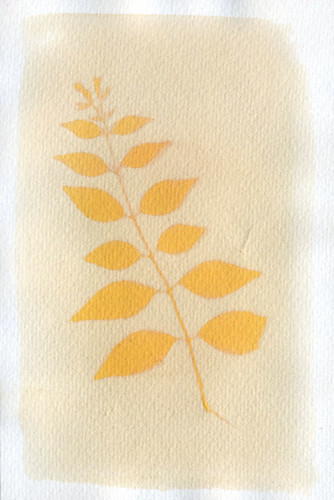
| Test #2, Sandalwood. |
These anthotypes were all printed using a much, much greater amount of alcohol than normal. Up till now, I've simply poured a small amount of the powder or what-have-you into a bowl and added just enough alcohol to make the mixture liquid and paintable. This time, I added a buttload of alcohol to the powder in a mason jar, attempting to reach the saturation point instead of heavily over-saturating the mixture. Why? Because I was tired of wasting pigment when the alcohol evaporated off and left me with a dust-covered sheet of paper.
The results so far:
Test #1: Mixture of turmeric and sandalwood. This is the most disappointing of the tests. It may be due to being pulled early, but when I checked it after two days, the field had bleached almost totally away. Problem being, the image itself isn't very visible either. May be the result of the turmeric's characteristic eye-burning-yellow color, when hue-shifted in Photoshop, the image is much more visible, but still not the best.
Test #2: Pure sandalwood, an extremely successful result. Three day exposure gave me a faintly visible pale orange field and a moderately bright image. A 10% bump in the darkness levels with Photoshop got me a nice, dramatic image with a pleasant color. Much better than the burnt-orange-red of high-concentration sandalwood which is almost as hard to see and enjoy as pure turmeric. The high levels of alcohol really shine with sandalwood, it seems.
Test #3: Another pure sandalwood. Virtually identical results as with Test #2, but this one has a darker spot in the center of it. I sat the paper on top of a water bottle to dry, and apparently the cap of the water bottle left a darker area for some reason. Somewhat annoyed. Image integrity very nice, though.
Test #4: Pure turmeric with high alcohol. Not a bad image result, though as with most turmeric images, it benefits from a hue-shift towards orange. The hue-shift makes the image stand out more and reduces the burn on your retinas from staring at the collected essence of the color Yellow. Boring composition makes me hate it, though.
Still waiting on Tests #5 and 6. Planning to give them two more days of exposure.
Test #5 is a boiled blackberry dye, with increased alcohol content to prevent spoilage of the berry juice. The juice at this point is nearly a year old and should probably be thrown out, but the aged juice has a very different color profile than fresh, so I'm hanging onto it. Smells funny.
Test #6 is a double-coated mixture, one layer of boiled blackberry, another of sandalwood. The resulting field color is a reddish-orange instead of the pure orange of sandalwood or the dull violet of boiled blackberry. The leaves used in this anthotype (virginia creeper) have begun to desiccate and shrink. Not happy about that, because it'll give me fuzzy edges on the image. Waiting to see final results before declaring total hatred, though.
EDIT: Ah-hah! I forgot one! There's another test currently in the works. I had a square of heavy linen soaking in boiled madder-root dye. Instead of following all the proper madder-root procedures, I just ground up the roots and tossed them into a pot of boiling water for a few hours, and collected my pretty red water. The linen soaked in it for ~24 hours and is now exposing. Should be ready in another week. I like to give fabric anthotypes a long, long exposure time.
Labels:
alternative processes,
anthotype,
dyes
Thursday, July 5, 2012
New I-lumen-ation!
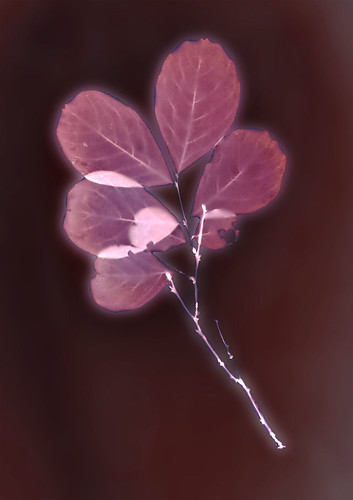
| Test #1, Crepe Myrtle |
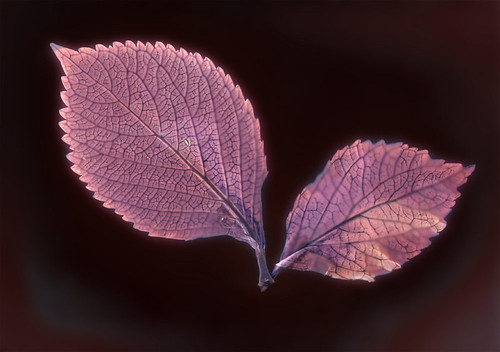
So far, in both my tests, the Polycontrast has produced a brown-red background with violet-maroon images, VERY pretty. One print, left out in light after exposure, has darkened to a blue-violet in the image, with an almost black field.
| Test #2, Hydrangea |
My scanner isn't doing a very good job of capturing these lumens acurately. I may need to buy a new one; there's some kind of horrible, streaky residue that seems to be between the two sheets of glass that make up the scan-plate. I've cleaned both sides of the scan-plate, but the residue remains the same. The scanner hasn't got any problems capturing my cyanovellums or anthotypes, the residue only shows up when scanning the large, blank backgrounds of the lumen prints. It's very distressing. I may need to start imaging them with a camera.
Labels:
alternative processes,
lumen prints,
papers
It's Been A Long Time
![]() |
| Test #4, most successful test! |
![]() |
| Test #1 |
- No color shifts, but the bleaching turned the dark blue a mottled cyan-green, with large patched bleached almost fully away. The original image retained its blue color, but was rendered visible where previously it had been almost hidden.
- The 'field' of the image turned a brilliant orange, and the image itself bleached fully out, leaving semi-translucent vellum without any coloration at all.
- The 'field' turned orange as with the previous test, but the image itself retained a blue-gray coloration, a very nice contrast.
- Results identical to #3
I haven't figured out what causes the difference between 1, 2 and 3/4. Oddly, 3 and 4 were bleached the longest, each one soaking for at least 8 hours. I would have expected them to leave no trace of blue at all, but they were the only ones to hold the blue color. Very odd.
![]() |
| Test #3 |
To make SuperTea! I brewed 8 family-sized bags of Wal-mart brand Black Tea in 2 cups of water for 5 minutes in the microwave and let the tea steep for two hours. I then squeezed the bags to get any extra liquid out of them. The SuperTea had evaporated down to about 16 oz of liquid by this point.
![]() |
| Test #1: post-borax and post-super tea |
I allowed Test #1 to soak in the SuperTea! for about two hours. The vellum stained heavily, but the image redeveloped about as expected. It's now a very dark blue-black, with the image a more mild tan. No reddish color shift as experienced with cyanotypes that have this process applied when printed on paper.
I've got lots more work ahead with my cyanovellums, but at the moment most of my frames are taken up with six new Anthotypes that'll be cooking for the next week! So excited to see the results!
Labels:
alternative processes,
bleaching,
cyanotype,
parchment,
toning
Friday, April 22, 2011
Art Badger and the Disappearing Dye
Nothing. Dammit. Three different colorants used on muslin and all of them bleached away to nothing except for the boiled blackberry dye. Boiled raspberry? Gone so far I couldn't even tell what it was without checking my notes. Turmeric disappeared even more. I'm pretty sure the only reason I could see the images at all is because the leaves had left an impression on the fabric. Now that the fabric is starting to relax from that impression, the images are almost totally gone.
Both these dyes (raspberry and turmeric) have worked on linen and raw silk, so I find myself wondering if maybe the problem isn't in the colorant, but the substrate.
Labels:
alternative processes,
anthotype,
dyes,
failures
Thursday, April 21, 2011
What's the Madder?
I got two new colorants (the term I've decided to use for solutions used to make anthotypes) recently from a natural dye website: sandalwood and madder root.
Sandalwood came as a thick, heavy powder with the same consistency as turmeric, which makes me hopeful. I mixed it with a bit of denatured alcohol and got the same strong, vibrant color as turmeric. Sandalwood is a pure, strong orange. I have to do more research on it to find out, but additional chemicals might be able to render yellow-orange and red-orange shades.
Madder root is, well, root. It's twigs that you have to soak overnight and grind into a pulpy mass of wood chips, which you then boil. The soup that resulted is a brilliant, bloody red and looked really, really great! Unfortunately, I already tried brushing the madder dye onto paper and got almost no results. I soaked the paper in the madder and got a pale red.. not at all the vermillion that Madder is apparently capable of according to my research.
I've got some raw silk soaking in the madder and I hope it will take better than paper did. I'll find out tomorrow when I check the dye bath. If that doesn't work, I've got some hope for evaporating off the water and collecting the powdery residue that precipitates to the bottom whenever I let the dye sit. I think THAT might have the alizarin pigment that madder carries. Once I manage to separate the dusty stuff from the liquid, I'll try an alcohol mix with the dust and see what I get.
The Madder-soaked paper will have to wait till tomorrow, but the sandalwood paper is already exposing. A three-day test exposure will be ready tomorrow!
Sandalwood came as a thick, heavy powder with the same consistency as turmeric, which makes me hopeful. I mixed it with a bit of denatured alcohol and got the same strong, vibrant color as turmeric. Sandalwood is a pure, strong orange. I have to do more research on it to find out, but additional chemicals might be able to render yellow-orange and red-orange shades.
Madder root is, well, root. It's twigs that you have to soak overnight and grind into a pulpy mass of wood chips, which you then boil. The soup that resulted is a brilliant, bloody red and looked really, really great! Unfortunately, I already tried brushing the madder dye onto paper and got almost no results. I soaked the paper in the madder and got a pale red.. not at all the vermillion that Madder is apparently capable of according to my research.
I've got some raw silk soaking in the madder and I hope it will take better than paper did. I'll find out tomorrow when I check the dye bath. If that doesn't work, I've got some hope for evaporating off the water and collecting the powdery residue that precipitates to the bottom whenever I let the dye sit. I think THAT might have the alizarin pigment that madder carries. Once I manage to separate the dusty stuff from the liquid, I'll try an alcohol mix with the dust and see what I get.
The Madder-soaked paper will have to wait till tomorrow, but the sandalwood paper is already exposing. A three-day test exposure will be ready tomorrow!
Labels:
alternative processes,
anthotype,
dyes
Saturday, April 16, 2011
Dyeing for Better Results
I've tried a bunch of different emulsions for my anthotypes. I'm not sure "emulsion" is the correct word, but I can't really come up with a better one. Dyes doesn't seem to fit. Neither does pigments. They're not exactly sensitizers, and that's harder to type out. Emulsions will have to do for the moment. Anyway.
Here are the results
- fresh blueberry - very pale blue-brown color. poor results after fourteen days.
- fresh blackberry - pastel blue-violet color. good results after six days. reacted with moisture to provide a yellow halo.
- fresh strawberry - pale pink color. acceptable results after six days. reacted with moisture to provide a yellow halo.
- red wine - pale red-brown color. acceptable results after two days.
- turmeric - intense yellow color. acceptable results after one day. good results after three days.
- paprika - pale yellow color. acceptable results after three days.
- turmeric-paprika mixture - strong orange color, with reddish streaks. good results after three days.
- turmeric-red wine mixture - same as turmeric, with a faint orange cast.
- turmeric-red pepper mixture - same as turmeric. red pepper did not have an effect.
- oak leaf juice - extremely faint green color. did not produce any image after seven days.
- grape juice - rich violet color. produced only a faintly visible image after six days. the color does not fade enough to show a good image.
- canned beet juice - rich red-pink color. still in testing.
- boiled blackberry dye - rich maroon color. produced poor results after fourteen days. the color does not fade enough to show a good image.
- boiled raspberry dye - rich pink-red color. still in testing.
- boiled carrot dye - extremely pale orange-yellow color. still in testing, no results expected.
- boiled spinach dye - extremely faint green color. produced poor results after five days.
Notes:
- Canned beets produce a more "true" pink than raspberries, which are closer to a pale red.
- If no reaction with moisture is noted, there has been none.
- Boiled dyes are created by boiling the plants for half an hour, mashing to a pulp, boiling for another 20-30 minutes and then straining. The resulting color seems far more intense (but less moisture-reactive) than the color produced simply by straining the fruit-pulp without boiling. The boiled dyes also seem to be more light-fast, which produces poorer images.
- Tumeric, Tumeric-Red Pepper and Boiled Blackberry have been tested on fabric with results essentially the same as on paper. No mordants have been used as of yet.
- No good Greens have been produced yet. Apparently there are very few reliable green colorants from plant-based materials because they get their color from chlorophyl, which doesn't work well as a pigment. Stupid plants.
Conclusions:
Turmeric is the most reliable, predictable and intense emulsion so far. The problem with it is that the yellow is so intense that it isn't very pleasant to look at it. The intensity of the yellow also blocks out a great deal of detail. I've taken to shifting the hue of turmeric scans so the detail recorded becomes visible. I would like to find a solution that has the qualities of turmeric in a different color. Adding paprika to the turmeric results in a duller, more orange color, but has streaking and striations because the paprika doesn't fully dissolve like the turmeric does.
I'm ordering some indigo and sandalwood online, and looking for some cheap annatto seed powder. I've heard these can all be used to get good results. Indigo produces blue, obviously, while sandalwood and annatto produce oranges.
Labels:
alternative processes,
anthotype,
dyes
Subscribe to:
Posts (Atom)